Migrating from Bill.com
Welcome to the Routable experience! We're thrilled to have you! We've prepared this quick guide to help you migrate your application from bill.com's API to Routable's in no time flat.
Where should I put my data in these sample requests?We've used ALL_CAPS for data values you will be providing to both APIs. We'll use the same field names for both APIs so you can easily map your data from one JSON request payload to the other.
Creating Vendors and Customers
In bill.com's API, Customers and Vendors are created via separate endpoints. In Routable's, the single Create a Company endpoint is used for both. This call will also create the Company in your integrated accounting software platform, if you have one. In Routable, we'll send this payload to the /v1/companies endpoint as a POST.
If you're also passing business addresses (for checks) or bank account information in your Bill.com vendor creation call, no worries. We'll add that with a Create a Payment Method call on the Routable side below.
{
  "devKey": "your_bill_dot_com_dev_key",
  "session_id": "your_bill_dot_com_session_id",
  "data": {
    "obj": {
      "entity": "Vendor",
      "isActive": 1,
      "accNumber": "YOUR_INTERNAL_VENDOR_ID",
      "companyName": "COMPANY_DISPLAY_NAME",
      "name": "COMPANY_LEGAL_NAME",
      "contactFirstName": "CONTACT_FIRSTNAME",
      "contactLastName": "CONTACT_LASTNAME",
      "contactPhone": "CONTACT_PHONE",
      "email": "CONTACT_EMAIL",
      "accountType": 1
    }
  }
}
{
"external_id": "YOUR_INTERNAL_VENDOR_ID",
"business_name": "COMPANY_LEGAL_NAME",
"display_name": "COMPANY_DISPLAY_NAME",
"contacts": [
{
"first_name": "CONTACT_FIRSTNAME",
"last_name": "CONTACT_LASTNAME",
"phone": "CONTACT_PHONE",
"email": "CONTACT_EMAIL",
}
],
"is_vendor": true,
"is_customer": false,
"type": "business"
}Onboarding Vendors
Routable supports three ways to onboard vendors. You can invite them to use Routable's pre-built onboarding flow (branded with your logo and colors) via email, embed our onboarding flow into your own with a redirect link, or collect payment method information in your own UI and submit it via the API. Here's a look at each.
Option 1: Email an Invitation to Use Routable's Onboarding Flow

Send an email to your vendor to log in and create their payment information when it's convenient for them.
You can send a small API call that will Invite a Company to use a Routable-hosted user interface, branded with your logo and colors, to add their own payment method information. The vendor will receive an email inviting them to use this workflow.
{
  "devKey": "your_bill_dot_com_dev_key",
  "session_id": "your_bill_dot_com_session_id",
  "data": {
    "vendorid": VENDOR_PLATFORM_ID,
    "email": "CONTACT_EMAIL"
  }
}
{
  "send_email": true,
  "get_links": false,
  "acting_team_member": "TEAM_MEMBER_ID"
}
Option 2: Use Routable's Onboarding Flow with Redirect Links
Use redirect links to seamlessly transition users from your application to Routable's onboarding flow and back.
With this option, you can skip the email and instead get a redirect link. You can embed Routable's hosted, branded onboarding experience right into the middle of your application's onboarding workflow, redirecting the user to our form and then back to your application as soon as it's completed.
{
  "send_email": false,
  "get_links": true,
  "acting_team_member": "TEAM_MEMBER_ID"
}
Bill.com does not support this option, so we can't provide a comparable API payload.
Option 3. Collect Payment Information in Your Application and Submit Via API
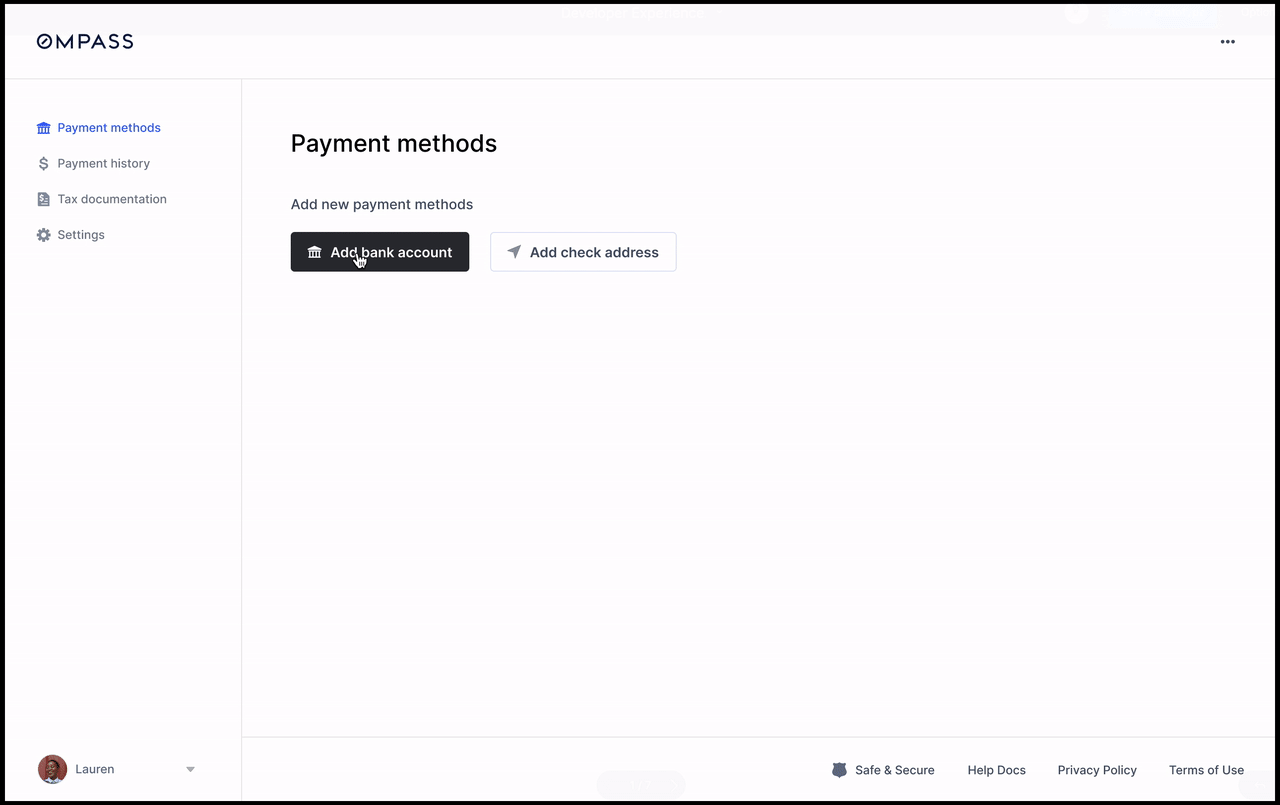
Collect and submit payment information in your own application.
If you've chosen to onboard your vendors on your own application, including the collection of banking information or physical addresses to mail checks, you'll want to attach those payment methods to the vendor profile. This step is not necessary if you used the Inviting Vendors step above.
With bill.com, the mailing address for checks is part of the main Vendor profile, so you have to either add that information at onboarding-time or do an update operation on the vendor. In Routable, mailing addresses are a type of PaymentMethod and added similarly.
{
  "devKey": "your_bill_dot_com_dev_key",
  "session_id": "your_bill_dot_com_session_id",
  "data": {
    "obj": {
      "entity": "VendorBankAccount",
      "isActive": 1,
      "vendorid": "VENDOR_PLATFORM_ID",
      "accountNumber": "ACCOUNT_NUMBER",
      "routingNumber": "ROUTING_NUMBER",
      "usersid": "TEAM_MEMBER_ID",
      "isSavings": false
    }
  }
}
{
"type": "bank",
"type_details": {
"account_number": "ACCOUNT_NUMBER",
"account_type": "checking",
"routing_number": "ROUTING_NUMBER"
}
}{
"devKey": "your_bill_dot_com_dev_key",
"session_id": "your_bill_dot_com_session_id",
"data": {
"obj": {
"entity": "Vendor",
"id": VENDOR_PLATFORM_ID,
"name": "COMPANY_NAME",
"nameOnCheck": "COMPANY_NAME",
"address1": "ADDRESS_1",
"address2": "ADDRESS_2",
"addressCity": "ADDRESS_CITY",
"addressState": "ADDRESS_STATE",
"addressZip": "ADDRESS_POSTAL_CODE",
"addressCountry": "ADDRESS_COUNTRY"
}
}
}{
"type": "address",
"type_details": {
"print_business_name": "COMPANY_NAME",
"address_line_1": "ADDRESS_1",
"address_line_2": "ADDRESS_2",
"city": "ADDRESS_CITY",
"state": "ADDRESS_STATE",
"postal_code": "ADDRESS_POSTAL_CODE",
"country": "ADDRESS_COUNTRY"
}
}Creating a Payable to a Vendor
Great! We've got a vendor, and we've got a way to pay them. All that's left is to send them the payment itself!
In bill.com, this needs to be done in two steps. First, we'll need to create a bill, and then you can pay it by sending a payment. In Routable's API, we can do this in a single Create a Payable call.
{
  "devKey": "your_bill_dot_com_dev_key",
  "session_id": "your_bill_dot_com_session_id",
  "data": {
    "obj": {
      "entity": "Bill",
      "vendorId": "VENDOR_PLATFORM_ID",
      "invoiceNumber": "12345",
      "invoiceDate": "2023-04-21",
      "dueDate": "2023-04-21",
      "billLineItems": [
        {
          "entity": "BillLineItem",
          "description": "iPhone 13",
          "lineType": "Item",
          "quantity": 1,
          "unitPrice": 500.00,
          "amount": 500.00
        }
     ]
  }
}
{
"devKey": "your_bill_dot_com_dev_key",
"session_id": "your_bill_dot_com_session_id",
"data": {
"vendorid": "VENDOR_PLATFORM_ID",
"bankAccountId": "VENDOR_BANK_ACCOUNT_ID",
"isFaster": true,
"billPays": [
{
"billId": "BILL_COM_BILL_ID"
]
}
}{
"acting_team_member": "TEAM_MEMBER_ID",
"amount": "500.00",
"delivery_method": "ach_expedited",
"line_items": [
{
"description": "iPhone 13",
"quantity": "1",
"style": "item",
"amount": "500.00",
"unit_price": "500.00"
}
],
"pay_to_company": "VENDOR_PLATFORM_ID",
"pay_to_payment_method": "VENDOR_BANK_ACCOUNT_ID",
"send_on": "2023-04-21",
"type": "ach",
"withdraw_from_account": "MY_BANK_ACCOUNT",
}🎉 That's it!
We told you migrating would be easy! Now that your payment automation is ✅ , the only question left is, what is your AP team going to do with all their free time? 🏄
If you want to dive deeper into the Routable API, the Guides in this Developer Portal are a great place to start. You can check out our Changelog for the latest improvements to the API as well. If you're looking for some practical examples of how Routable might get integrated into your codebase, the Recipes section is a fantastic resource.
💗 Need a hand? No worries! We got you.
Routable's Developer Experience Team is standing by to answer any questions you have, provide guidance with solutioning, or just to walk through the docs together with you. We're with you every step of the way to ensure that your integration is successful in development, at launch, and beyond.
Integrating your accounting software?If you're planning on integrating your accounting software with Routable, we'll need to make some slight tweaks to these payloads. Don't worry, they're super easy, too! Check out the docs for our QuickBooks Online, Oracle NetSuite, Sage Intacct, and Xero integrations for details on what needs to change, or just reach out to the Routable's Developer Experience Team for a quick hand.
Updated 9 months ago