Collecting Payment and Tax Information
Choose your implementation style
Great job! We've got a record for your new vendor. In order to send them a payment, we're going to need some information from them about their bank (if we're sending ACH transfers) or their mailing address (if we're mailing physical checks). You can use Routable's interface for this interaction, or create your own.
Routable provides three distinct pathways to obtaining account information from your vendors and customers. See the sections below for details on each methodology. You can even mix and match to suit your needs!
📨
- Email an Invitation
Use the Invite a Company API endpoint to send an email invitation to the Contact(s) attached to your the Company. The email will contain a link that directs the user to a branded, Routable-hosted form that gathers payment details for every country Routable supports, so you don't have to worry about user interface or validation for any of this data.
🔗
- Use a Redirect Link
Using the same Invite a Company API endpoint with different parameters, request a link that you can present your users or redirect them to, in order to embed the Routable onboarding process into your own application's vendor or customer intake workflow. Uses the same branded, pre-built form as emailed invitations, but without sending your contact to their email for a link. Provide a confirmation URL, and we'll also redirect the user back to your site to continue your onboarding process when we've collected everything we need to get them set up in Routable for you.
🔨
- Build Your Own User Interface
If you'd prefer to fully construct your own user interface for collecting payment data rather than using Routable's pre-built solution, no problem! Collect a few fields and pass them to our Payment Methods API, and you can get your partners up and running in no time.
📨 1. Email an Invitation
Routable provides a simple workflow to "invite" a company to be a part of your organization. The Contacts you added as part of the previous step will receive an email with a link inviting them to add their Payment Method details on a form built and managed by Routable.
All we need to do is send a request Invite a Company endpoint to get them onboard!
🏤 Creating and Inviting a Vendor, Domestic OR Cross-border
We'll need the id from the Company we created in the previous step to make this call, as it's supplied in the URL. We'll also need the Acting Team Member ID.
{
    "acting_team_member": teamMemberId,
    "message": "{{your custom email message here}}",
    "send_invite_email": true,
    "get_links": false
}
The default Contact(s) on the Company you created in the previous step will receive an email inviting them to enter their payment information on a Routable-hosted web form. It will look something like the example below. Use the message field in the Invite a Company request to add any custom information or messaging to the body of the email.

The green Register to be paid button will take your Contact to the form described in the Routable Company Onboarding Form section below.
🔗 2. Use a Redirect Link
Do you want to use the Routable onboarding form, but you'd prefer to integrate the experience into your own onboarding flow rather than waiting for your partners to receive an email? No problem! We'll send a slightly modified version of the Invite a Company call discussed above, but this time, we'll request links rather than an email:
{
    "acting_team_member": teamMemberId,
    "send_invite_email": false,
    "get_links": true,
    "confirmation_redirect_url": "https://www.example.com/after-joining"
}
Want to pre-send Payables?The onboarding link that is returned as part of the Use a redirect or link to direct the user to Routable's onboarding form will not allow the vendor to accept any pending Payables in the same session, however, the link that is sent via email will allow it. This is done for security reasons. If you need to use Use a redirect or link to direct the user to Routable's onboarding form, it is recommended to not send Payables to the invited Company until their onboarding has been completed.
Now, the response will include, for each Contact in the returned Company resource, a personalized invitation_url for onboarding. You'll need to identify which Contact in the Company is doing the actual onboarding, and direct them to the external_flow_url when you're ready for them to do their Routable onboarding via the form described below. When they finish the Routable onboarding form, we will redirect them to the URL you specified in your confirmation_redirect_url in the request, where the user can continue the onboarding workflow in your application.
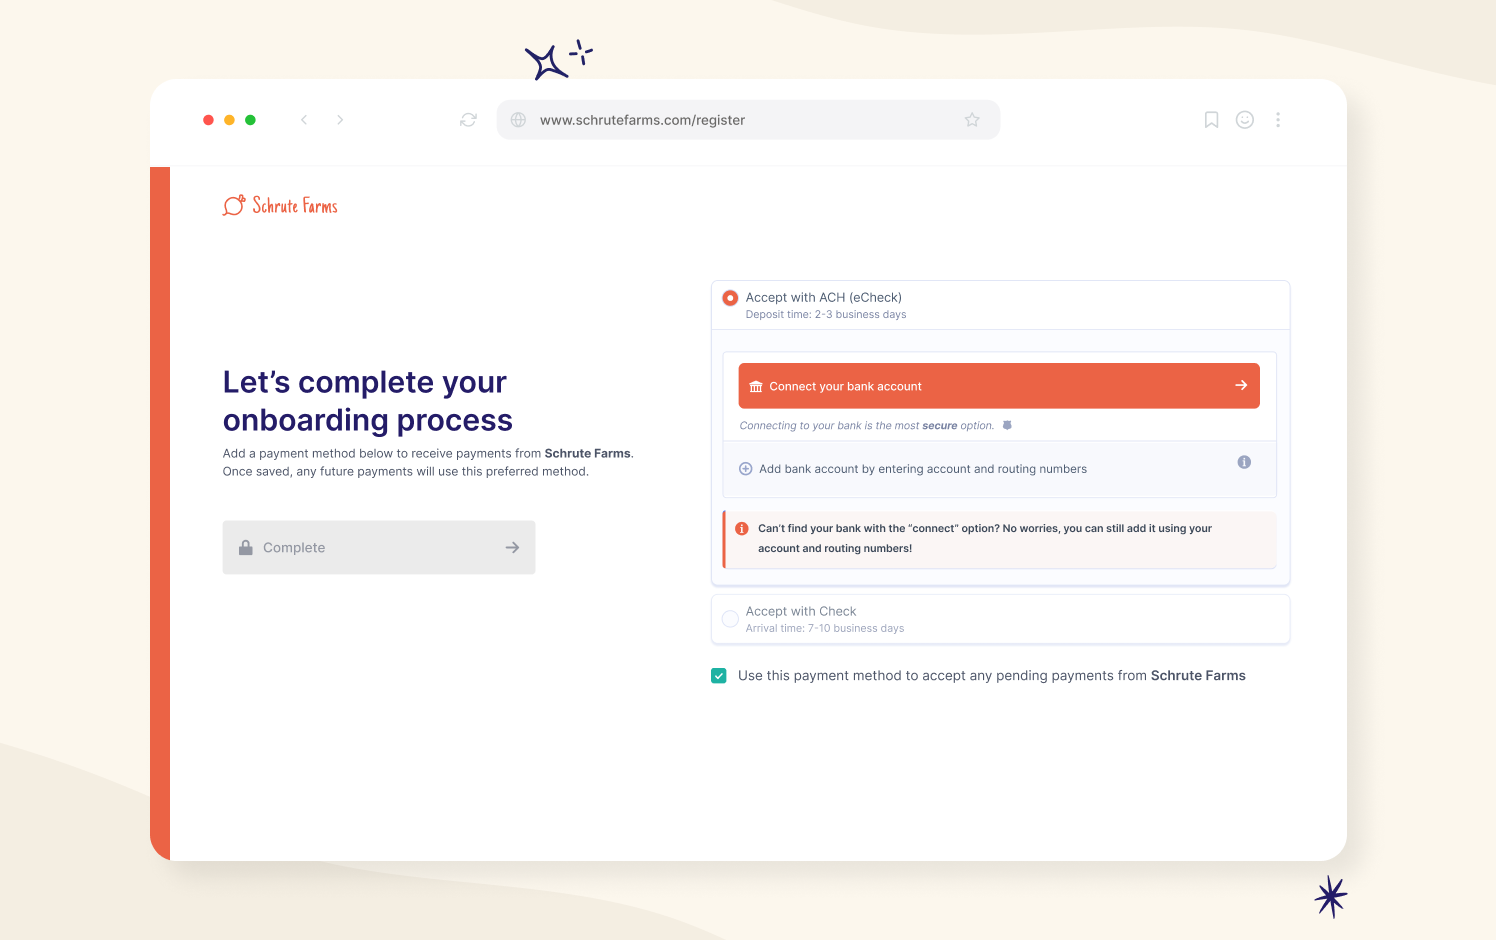
(Options 1 & 2) Routable's Company Onboarding Form
The following form, hosted and maintained by Routable, allows your vendors and customers to enter their payment details and tax information. The form will take care of collecting and validating all of the relevant data, including the various distinctions between payment requirements for the various countries and territories we support.
After completing the payment information fields, vendors (but not customers) will be prompted to enter tax information, to populate a W-9 form (for US domestic vendors) or a W-8-BEN / W8-BEN-E form (for international vendors). You won't need to do anything else to collect tax information for this vendor.
Branding your onboarding forms and emails
Routable provides an easy way to add your company's logo and colors to the emails and forms we show your vendors and customers. You can configure your branding settings from your Routable Dashboard.
In order to create an invitation via options 1 or 2 above, a
Companymust have one or moreContactsthat are set toactionablein thedefault_contact_for_company_managementfield. OnlyContactsso configured have permission to adjust payment method data, so if no one has the permission, no actionable invitation can be generated.
🔨 3. Build Your Own User Interface
If you've chosen to build your own user interface for collecting Payment Methods from your vendors and customers, this section is for you.
Routable supports payment methods of types address and bank. The address payment method is used when you send a Payable via a physically-mailed check, and the bank payment method is used for ACH transfers. A third payment method, international, provides the same types of details as bank, but accepts more complex data to allow the flexibility to support the requirements of the various countries you can send international Payables to with Routable.
Collecting a bank Payment Method
bank Payment MethodYou'll need to provide your users a form to populate banking information such as routing number, account number, and account type (checking or savings). We've provided a sample form for you below.
Once you've collected this information from the user, send a Create a Payment Method call to save it.
{
"type": "bank",
"type_details": {
"country": "US",
"account_number": "12345861398613",
"account_type": "checking",
"routing_number": "063100222"
},
"is_primary": true,
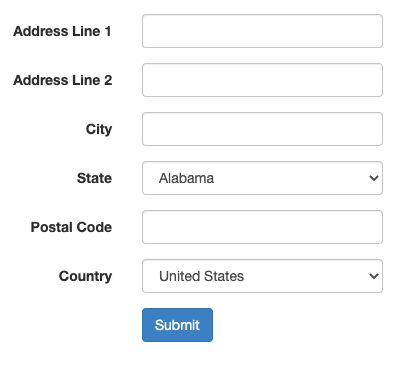
}Collecting an address Payment Method
address Payment MethodWe use address Payment Methods to mail physical checks. You can provide a form for the user to enter their address, or, if you've already collected it as part of the user onboarding process, you can just submit the address you've already collected via the API.
Once you've collected this information from the user, send a Create a Payment Method call to save it.
{
	"type": "address",
	"type_details": {
		"country": "US",
		"address_line_1": "2018 N Main Ave",
		"address_line_2": "Suite 150",
		"city": "Scranton",
		"postal_code": "18508",
		"state": "PA",
		"country": "US",
		"print_name": "Bob Vance",
		"print_business_name": "Vance Refrigeration"
	},
	"is_primary": true
}
Collecting Tax Form Information (Vendors only)
After creating a vendor, you can collect tax information to populate a W-9 form (for US domestic vendors) or a W-8-BEN / W8-BEN-E form (for international vendors) for them. First, retrieve the Company to obtain the tax_form_type that is expected for this Company. Then, use the Create company tax form endpoint to submit the tax data.
Domestic vs. International VendorsFor vendors in the United States, use a
w9TaxForm.
For vendors outside the United States, use aw8benTaxForm forpersonalCompanies and aw8ben_eTaxForm forbusinessCompanies.
When submitting your TaxForm, use the Create Tax Form endpoint. You have two options to collect the "signature" of your vendor:
- You can use the
uploaded_formobject to upload a PDF of a signed form - for example, if your vendor uploaded it when they onboarded to your application. - You can have the vendor Contact enter their legal name, and submit it via the
signaturefield.
{
  "type": "w9",
  "acting_team_member": teamMemberId,
  "business_name": "Vance Refridgeration LLC",
  "business_entity_type": "llc_single_member",
  "display_name": "Bob Vance Refridgeration",
  "exemption_fatca_code": "A",
  "exemption_payee_code": 2,
  "government_id": {
     "type": "ein",
     "value": "123456789"
  },
  "mailing_address": {
    "address_line_1": "123 Some Street",
    "city": "Somewhere",
    "state": "WA",
    "postal_code": "12345",
    "country": "US"
  },
  "signature": "Robert Vance"
}
{
"type": "w8ben",
"acting_team_member": "b0caba90-c21e-49d2-85da-a138c5c0e59e",
"country_code": "BR",
"government_id": {
"value": "12345667788",
"type": "CPF"
},
"legal_name": "William Silva",
"mailing_address": {
"address_line_1": "Av Paulista, 999",
"address_line_2": "Ap 15",
"city": "São Paulo",
"country": "BR",
"postal_code": "01311-300",
"state": "SP"
},
"residence_address": {
"address_line_1": "Av Paulista, 123",
"address_line_2": "Ap 10",
"city": "São Paulo",
"country": "BR",
"postal_code": "01311-100",
"state": "SP"
},
"signature": "William Silva",
"treaty_benefits": {
"article_and_paragraph": "Article 7, paragraph 1",
"type_of_income": "Sales",
"withholding_rate": "12.25"
},
"us_government_id": {
"value": "999999999",
"type": "itin"
}
}
  {
    "type": "w8ben_e",
    "acting_team_member": "b0caba90-c21e-49d2-85da-a138c5c0e59e",
    "chapter_three_status": "corporation",
    "chapter_four_status": "active_nffe",
    "country_code": "BR",
    "government_id": {
        "value": "00523904000173",
        "type": "CNPJ"
    },
    "giin": "XY7PQW89ABCUV123",
    "legal_name": "Bob's Burgers",
    "mailing_address": {
        "address_line_1": "Av Paulista, 999",
        "address_line_2": "Ap 15",
        "city": "São Paulo",
        "country": "BR",
        "postal_code": "01311-300",
        "state": "SP"
    },
    "payment_received_by_intermediary": false,
    "residence_address": {
        "address_line_1": "Av Paulista, 123",
        "address_line_2": "Ap 10",
        "city": "São Paulo",
        "country": "BR",
        "postal_code": "01311-100",
        "state": "SP"
    },
    "treaty_benefits": {
        "article_and_paragraph": "Article 10",
        "limitation_on_benefits": "publicly_traded_corporation",
        "type_of_income": "Sales",
        "withholding_rate": "12.25"
    },
    "uploaded_form": {
        "signed_on": "2023-01-01",
        "name": "uploaded-w-8ben-e-tax-form",
        "data_uri": "data:application/pdf;base64,JVBERi0xLjAKMSAwIG9iajw8L1R5cGUvQ2F0YWxvZy9QYWdlcyAyIDAgUj4+ZW5kb2JqIDIgMCBvYmo8PC9UeXBlL1BhZ2VzL0tpZHNbMyAwIFJdL0NvdW50IDE+PmVuZG9iaiAzIDAgb2JqPDwvVHlwZS9QYWdlL01lZGlhQm94WzAgMCAzIDNdPj5lbmRvYmoKeHJlZgowIDQKMDAwMDAwMDAwMCA2NTUzNSBmCjAwMDAwMDAwMTAgMDAwMDAgbgowMDAwMDAwMDUzIDAwMDAwIG4KMDAwMDAwMDEwMiAwMDAwMCBuCnRyYWlsZXI8PC9TaXplIDQvUm9vdCAxIDAgUj4+CnN0YXJ0eHJlZgoxNDkKJUVPRg=="
    },
    "us_government_id": {
        "value": "999999999",
        "type": "tin"
    }
  }
Outstanding work!
Well done! Now the Company data is stored, the payment method(s) are collected, and the Company is in the accepted status. We're ready to send a payment! Let's get to it in the Your First Payable section!
Company StatusYou can track the Company's process through the onboarding journey using the
statusfield of the Company. As you saw in the Onboarding Your Vendors section, a Company that has been added but not yet invited is in theaddedstatus. if we send an invitation using the Invite a Company workflow, the Company will transition to theinvitedstatus. Once they complete the onboarding form and enter payment information, a final transition to theacceptedstatus will occur. Vendors in this status are ready to be paid! 🚀Note that if you don't use the Invite a Company workflow, a Company will remain in the
addedstatus even after aPaymentMethodhas been added via the Routable Dashboard or API.You can also track the invitation status of Companies in your applications using the Company Webhooks.
Updated 9 months ago